Illustration is a powerful medium for visual storytelling, branding, and communication. Whether you’re designing artwork for a product, website, or creative campaign, the illustrations you create play a crucial role in conveying a message clearly and effectively. In this article, I’ll walk you through the creative steps of making an illustration set—combining my years of experience with practical advice to help you enhance your process and achieve professional results.
1. Conceptualization and Idea Generation: Laying the Foundation for Visual Storytelling
As professional illustrators, we know that every successful illustration set begins long before the first line is drawn. The first step in our process is conceptualization, where we dive deep into understanding the project’s core message and target audience.
Brainstorming Ideas
At this stage, we begin by reviewing project briefs, conducting research, and gathering inspiration. This helps us ensure that the illustration aligns with the client’s goals and resonates with the audience. For example, when we worked on a branding project for a tech startup, we focused on futuristic design elements that reflected the company’s innovation.
Sketching Initial Concepts
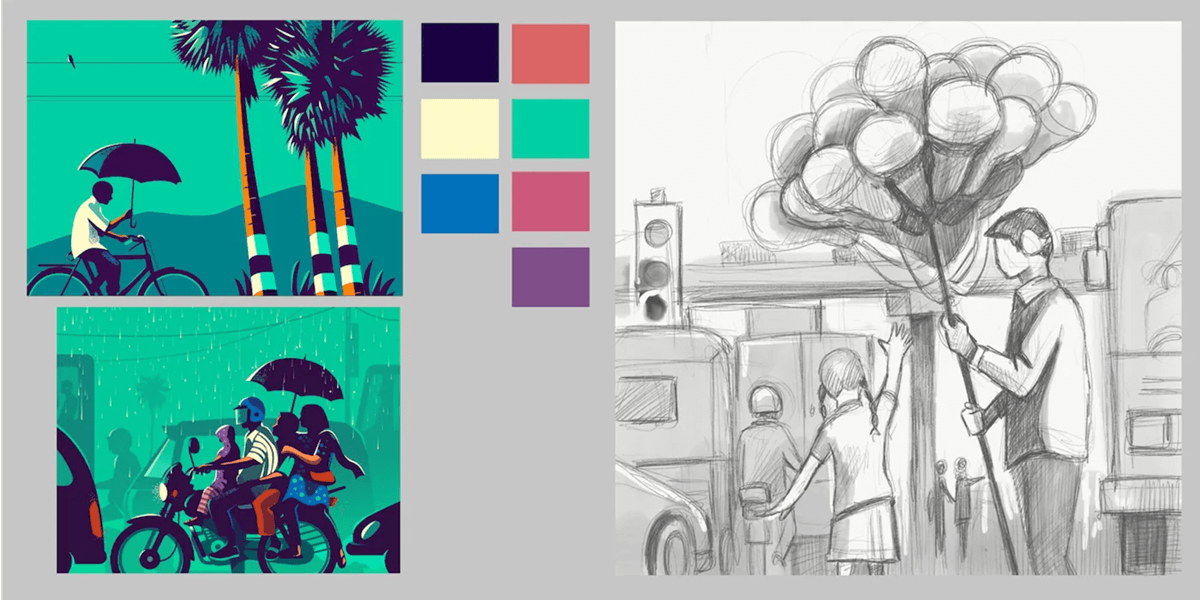
The next step is sketching rough ideas and thumbnails. This process allows us to experiment with different compositions and visual elements without committing significant time to one direction. It’s a flexible, free-flowing stage that encourages creativity and exploration.
Mood Boards and References
Creating mood boards and collecting visual references is key to solidifying the direction. We find that referencing images—whether from other art, nature, or real-life objects—helps us define the color palette, texture, and overall mood of the set.
2. Defining Style and Visual Language: Crafting the Visual Identity
Once we have a solid direction, the next step is determining the visual style. This phase plays a crucial role in ensuring that our illustration set feels cohesive and communicates the intended message.
Choosing the Style
The style will set the tone for the illustration. For instance, a playful, cartoonish style works best for a children’s book, while a sleek, minimalist approach may be perfect for a corporate tech brand. We make sure to tailor the style to the project’s audience and objectives.
Visual Language
At this stage, we carefully select the color palette, textures, and line work. Color, for instance, is a critical part of visual language. Warm colors like orange and red create energy, while cooler tones like blue or green evoke calm and professionalism.
Consistency in the Illustration Set
Maintaining a consistent visual language is essential in a set. Whether we’re working on character designs or a series of icons, every piece should visually tie back to the same theme, ensuring a unified, professional outcome.
3. Composition and Layout: Creating a Balanced and Dynamic Visual Flow
Composition is the heart of any great illustration. As experienced artists, we know that getting the composition right is critical for visual clarity and impact.
Framing and Composition
We always consider the rule of thirds, a design principle that divides the canvas into a 3×3 grid, ensuring key elements are placed along the lines or their intersections. This technique ensures our illustrations are dynamic and visually engaging.
Balance and Flow
Achieving balance ensures that the illustration doesn’t feel too heavy on one side or too sparse. We distribute visual weight through size, contrast, and color. Creating flow allows the viewer’s eye to naturally move across the piece, guiding them from one element to the next, leading to a cohesive visual journey.
Adjusting for Different Formats
Illustration sets are often repurposed across different platforms. Whether it’s a website, social media, or print, we adjust the composition accordingly. For instance, illustrations for social media often require a square format, while a magazine layout needs a vertical composition.
4. Detailed Illustration and Refinement: Adding Depth and Definition
Once we’re happy with the concept and layout, we move into the detailed illustration phase. This step requires patience and precision to turn rough sketches into refined works of art.
Layering and Building Up Detail
This is where the illustration begins to take shape. We work on adding detailed lines, defining forms, and building up texture. Layers are essential for organizing the elements—whether we’re working on a character design or a detailed background. Tools like Photoshop’s layer masks allow us to refine and adjust details without altering the base art.
Adding Texture and Shading
Shading adds depth, while textures make the illustration come alive. We use various techniques, from soft gradients for lighting to textured brushes for organic elements. The goal is to ensure that each part of the illustration feels three-dimensional and real.
Polishing the Artwork
This is where we ensure every detail aligns perfectly. From linework refinements to the final addition of highlights and shadows, this step is about polishing every element to create a harmonious and visually appealing finished product.
5. Color Selection and Palette Development: Setting the Tone
Color is one of the most powerful tools in an illustrator’s toolkit. It can set the mood, guide emotions, and enhance the storytelling aspect of an illustration.
Choosing Colors for Mood
Choosing the right color palette is crucial to conveying the desired mood. For example, bright, vibrant colors may evoke energy or happiness, while muted tones can suggest sophistication or tranquility. We carefully choose colors that align with the project’s tone and message.
Harmonizing the Palette
We then refine the palette, ensuring the colors complement each other and create visual harmony. Limiting the color palette and using analogous or complementary colors ensures the illustration doesn’t feel overwhelming or disjointed.
Experimenting with Color
Experimenting with color variations is crucial. Sometimes, we test different schemes to see how small changes can drastically alter the mood of the piece, helping us find the best fit.
6. Digital vs Traditional Illustration Techniques: Choosing the Right Tools
The medium used can greatly impact the final look of the illustration. In today’s digital age, both traditional and digital methods play key roles in the process.
Digital Illustration Tools
We primarily use industry-standard digital tools like Adobe Photoshop, Procreate, and Illustrator. These tools offer a wide range of brushes, effects, and layer options, giving us control over every aspect of the artwork.
Traditional Illustration Methods
While we often rely on digital tools, traditional media like pencils, ink, and watercolor can provide a unique texture and organic feel. In our experience, blending traditional methods with digital refinement can yield some of the most stunning results.
Mixed Media
Combining both methods allows us to bring out the best of both worlds. For instance, we might start with hand-drawn sketches and then refine them digitally, using digital brushes to add textures and effects that would be difficult to achieve traditionally.
7. Feedback and Iteration: Refining Through Collaboration
One of the most important aspects of the illustration process is feedback. Whether it’s from clients, team members, or fellow artists, getting feedback is essential for refining the design.
Collaborating with Clients/Teams
In commercial projects, client feedback plays a significant role in shaping the illustration. We work closely with clients to ensure the design reflects their vision while maintaining our artistic integrity.
Refining Based on Critiques
Feedback often leads to revisions. Whether it’s adjusting the color palette or refining the composition, incorporating critique ensures that the final illustration meets the client’s needs.
Iterative Process
Illustrations rarely come out perfect on the first try. In fact, revisions are essential. Each revision brings the artwork closer to its ideal form, so we always maintain a flexible and open approach to feedback.
8. Finalizing and Preparing for Output: Ready for the World
Once the illustration is complete, it’s time to prepare it for output. This step ensures the artwork is optimized for the platform or medium it will be displayed on.
Exporting for Different Mediums
Illustration sets may be used in various formats: print, web, and social media. We ensure that each version is optimized for the platform. For print, high-resolution formats like TIFF or PDF are used, while JPEG and PNG are ideal for digital formats.
Resolution and File Formats
It’s important to use the correct resolution. For print, illustrations need to be at least 300 dpi, while digital works can be created at 72 dpi. We ensure that the file formats are compatible with the client’s needs.
Final Review
Before delivering the final piece, we conduct a thorough review to check for any potential issues, from color accuracy to file resolution, ensuring everything is perfect.
Conclusion: Bringing it All Together
Creating an illustration set is a complex and creative process that requires both technical skill and artistic intuition. By following these key steps, from conceptualization to finalizing your artwork, you can produce a stunning illustration set that communicates effectively and resonates with your audience.
FAQs
1. What is the first step in the illustration process?
The first step is conceptualization, where you brainstorm ideas, gather references, and understand the project’s goals to ensure the final artwork aligns with the intended message and audience.
2. How do you choose the right colors for an illustration?
Choosing colors depends on the project’s mood and message. Warm colors evoke energy, while cooler tones suggest calmness. A harmonious palette enhances visual appeal and communication.
3. Do you use digital or traditional illustration methods?
Both methods are used. Digital tools offer flexibility and efficiency, while traditional techniques can provide a unique, organic feel. Often, a combination of both creates the best results.
4. How do you ensure an illustration stays cohesive?
Maintaining a consistent visual language, including style, color palette, and textures, ensures an illustration set feels cohesive. This unifies elements and creates a strong, recognizable identity throughout the artwork.
5. What role does feedback play in the illustration process?
Feedback is crucial for refining the illustration. Collaborating with clients, team members, or peers allows for adjustments and improvements, ensuring the final product meets expectations and aligns with project goals.